Adding Randomness to a Quilt

In the fall of 2021, I was listening to this episode of Let’s Learn Everything and Tom Lum was talking about randomness. I thought to myself, hm, what if I added some randomness to a quilt. What might that look like? I put that idea on the backburner as I had some other things to attend to first.

Then, I got the idea to sew strips together and join them on the diagonal, with a strip on that diagonal. I sketched the idea and put it down to finish aforementioned projects. When it was time to tackle randomness, I decided to start with this idea.

Sketch of a block with strips going horizontally and vertically, divided on the diagonal.

I made notes about flipping a coin to determine the direction of the diagonal and a color chart corresponding to a 6 sided die.

I decided to have “black” triangles and “white” triangles, so I alternated between black or white and a colored strip. Each time a color was needed, I rolled the die. Here are the six pieces that came out of that process. I used the same colored strips for both the black and white “blocks”.

6 rectangles with alternating colored and black or white strips
I printed these out and cut them up and tried to put them together. I realized that one set would have to be cut in one direction and the other, the opposite direction.
Here they are, cut on the diagonals, with the extra above and below.
I numbered them 1-6 for each of the black and white triangles and rolled the die to determine pairs and got this.
Then I arranged them symmetrically so the coin flip could determine which way the diagonal went.
The coin flip gave me this and I hated it, but I decided to plunge ahead and see what I could do with the leftovers to fix it. I am a quilter, after all.
Now I had squares that were half white/half black with random strips of color. I didn’t try to randomize the pairing here. I thought maybe I could do a checkerboard sort of thing, but that didn’t look right. Then I got the idea to cut these on the diagonal and use a plain colored triangle on the other side.
Here are the 50/50 blocks with a colored triangle. Now, how to place them? Use the die! I went with my color chart and started rolling. I chose the slant of the diagonal for these and got this.
All pieced together
And here it is quilted. I didn’t add randomness here either. I tried to quilt sections that seemed like bigger shapes. I did print out the pieced version and do a quilting diagram, which I mostly followed. I tried to do contrasting colors for the shapes and tone on tone for the colored triangles.

I’m calling this quilt Borders are Arbitrary. Let me know if you have any questions! I will definitely be revisiting this method in the near future.

Picture of the back.

Tiny reversible purse

What you need:

Sewing machine, thread, needles, scissors, pins or Wonder Clips, Rotary cutting supplies, fabric, and Pellon 101 Shape Flex interfacing.  If you want to make the drawstring-and-loops variation, you will also need 40 inches of ⅜-inch wide grosgrain ribbon, cut into a 28-inch length plus 6 2-inch pieces, and a stop-lock toggle.

Materials included in the kit:

  1. 2 rectangles of fabric that are 13.5 inches by 6.5 inches.  Although the bag is reversible, choose one fabric for the outside and one for the lining. Fuse interfacing to both rectangles
  2. 2 five inch squares of fabric for the circular bottoms
  3. 2 rectangles of Pellon 101 Shape Flex interfacing that are 6.5 in wide and 20 in long
  4. A strip of fabric for your strap that is 44 to 60 inches long and 2.5 inches wide
  5. A strip of Shape Flex that is 1.75 inches wide and the length of your strap to fuse on your strap
  6. A template with a diameter of 118 mm.
  7. 28 inches of 3/8inch wide grosgrain ribbon plus 12 inches for the drawstring and loops variation  and a stop-lock toggle

THE STRAP

I like to wear my bags crossbody style and have found that taking a measurement from hip to opposite shoulder and doubling it gives a pretty good length for this which is why there is a range given for the strap measurement.

Strap with interfacing
Strap material with interfacing, ready to be fused.

Sew right sides together and turn the tube so the right side of the fabric is facing out. I used a tube turner, though you can find other methods online. Then top stitch the strap 1/8 inch from each long side. You might find your blind hem foot helpful for this.

The Body

strips of Australian aboriginal prints
Taking a picture to remind myself of the order of the fabrics.
One strip of fabric on top of the interfacing
If you are foundation piecing your tube, you start with the first piece of fabric right side up and lay the next strip on top of that.

Sew right sides together of your 6.5 x 13.5 in rectangle to make a cylinder.

Oops, I trimmed it a little too short, so I had to sew something on, might as well make it fun. This is one of the places you can really let your creativity fly. You can use one piece of fabric or as many as you want and if you find out it’s not the right size, sew on some more and trim it until it is.

The Circle

Use the circular template and a pencil to trace a circle on the back of your two 5-inch squares of fabric. The circle includes a ¼ inch seam allowance.

Putting the cylinder and circle together (You will do this twice)

Tube of fabric sitting on top of the circle to make sure the orientation of everything is correct
Starting to stitch the circle to the bottom of the tube.

Here is a video of me stitching the circle to the bottom of the tube. Things to remember: the math works. The circle will fit the circumference of the tube and YOU ARE THE BOSS OF THE FABRIC. Go as slowly as you need. 

Tube with circle stitched onto the bottom.
Tube with circle on the bottom to check alignment.
Tube with circle inside to start the sewing.
Finished tube with circle stitched on the bottom.

Next you will pin (or clip) your strap and loops (if desired) to the outside of one of the cylinders. It may feel like it’s upside down, but that is the correct orientation.

IMG_2250

It will get folded under and sewn over. Make sure you are placing the two ends of the strap across from itself and that it’s not twisted.

Place the outside of bag with the strap tucked under, to the inside of the bag, right sides together.
Sew the two bags together, keeping the tops aligned. Some machines allow you to remove part of the table to create a narrower working surface for sewing sleeves or other smaller cylinders. If your machine does this, it may make this step easier.
Be sure to leave a gap about 2 inches long to turn the bag right side out.
Reach in and pull the bag so the right sides are out.
When it’s all turned, you will have a little gap like this.
Fold those edges in and finger press.
Top stitch all the way around the bag.
Done! (If using loops, thread the ribbon through the loops and then through the stop lock. Put a couple drops of fray check on the end of the ribbon.)
And the other side. You’ve made a reversible bag!

BadAssHerstory: I AM HER(E) NOW


When Shannon Downey put out her call for BadAssHerstory, I knew I wanted to participate.

Initially I started doodling, so to speak, on these two pieces which were left over from aikido uniform jackets. I had this idea about cloud chambers and a secret code being representative of different stages of my life, but when I got to the top of the left side, where I start to spread my wings, I didn’t know where to go from there. So I put it down. (The blue side was dyed with indigo a year after I did the stitching in blue, and then I just started stitching in white as a contrast to the other side.) This piece is more about mark making than it is about me or my story.

IMG_0634.JPG

In the meantime, this past spring, in April, I decided to start a bullet journal. The idea was never that I would use it faithfully every day. In fact, I barely touched it over the summer, BUT I have used it regularly and one of the things I use it for is to write down or (gasp!) sketch ideas. One day, I had this very strong idea of just presenting myself in mountain pose saying  in bold letters I AM HERE NOW.

Continue reading

Wonder: Establishing and Maintaining a Creative Practice

I have blogged about this before, in part, but yesterday I gave a talk and I know some of my friends who live in the ether wanted access to it as well.  I departed somewhat from the script and talked about specific mistakes, but basically, this is what I talked about.

——-

quilt3

Because I was talking to a group of quilters, I started with my first quilt. I will note I have not attempted piecework this complicated since.

Take what works for you and leave the rest behind.

Start with the basics: get enough sleep, eat well, exercise. Take your medications.

Commit to your creative practice — REGULAR PRACTICE. Good writers go and write for X many minutes/hours or whatever it is a day. If you want to be creative, you have to do it. Not all of us have the luxury of doing it every day, but for me, even if I’m not in my studio, I still spend part of the day thinking over ideas.
Three main components:

Structure (physical, chronological,)

Inspiration — many sources

Challenges — how to challenge yourself and what to do when big challenges (ie, mistakes) occur
Structure:

Physical: have a dedicated space — it doesn’t have to be a whole room. Some people manage to work out of a tiny corner. I find having a whole room dedicated to my practice enormously helpful. I can maintain an organized stash of materials that are at the ready when inspiration strikes. Or when I need to just force myself to sew two pieces of fabric together.


Having the machine set up and ready to all the time made a huge difference in my willingness to get down to business.

Time: Commit to your practice.  1 day a week every day for an hour.  Whatever works for you. Know what time(s) of day work for you and don’t sacrifice them.

Continue reading

Trajectory: Escape Velocity

I wrote this blog post for IAmSciart, which I hosted at the end of last year.

My daughter says I have six social lives — quilting, art, twitter, dancing, and singing friends (and then of course whatever my kids are up to). I tell you this by way of introduction. In my creative work especially, I have a finger in every pot and I’m happiest when some of them interact. 

In 2015, I worked for most of the year on 8 panels that tell a story of evolution. I was inspired by a specific call for entry on the theme of Diaspora (the spreading of a population outwards). As soon as I saw it, my mind went immediately to evolution — from the Big Bang throughout all of history to the future. I could see populations exploding outwards.  

Then came the execution. Some of them were easy and obvious.

The first panel, The Big Bang was probably the easiest. I had an idea and it was simple and elegant and it came out exactly as I’d imagined it.  People look at it and immediately know it’s a big bang! 

bigbang

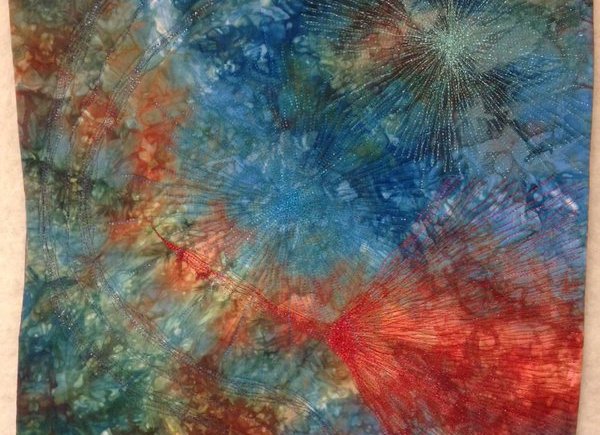
The second panel, Primordial Soup, is much more subtle.  The viewer can see lots of little sparkles from crystals that represent some elements. I placed them, so they are closer together in the center and radiate outwards in a somewhat spiral shape. On top of them, I put a strand of DNA made out of wire and beads.  Even inanimate objects spread outwards.

psoupsmall

I worked on this project from March to October of 2015.  I knew that trying to tell all of history was a huge undertaking and I figured the only way I could do it was to break it down into panels (or chapters, if you will). Initially I had thought there were going to be 7 panels, but I wasn’t set on that number, which was fortunate because later I realized I’d left something out. 

I do not work in a vacuum. I’m always talking about what I’m working on, which was a good thing because Kim Gibson (a quilting friend) told me about black smokers. I went home and researched them and oh my god did I fall in love with them. Clearly this was a concept that I needed to illustrate in my timeline, so that’s how Black Smokers happened (scientists think it was the heat from hydrothermal vents that may have triggered early life). In this one, as in the panels following it until the last one, the expansion outward is from the bottom of the sea floor to the top rather than from a sort of bird’s eye view with a bull’s eye in the middle (if you’ll forgive the mixed metaphor).

blacksmokers

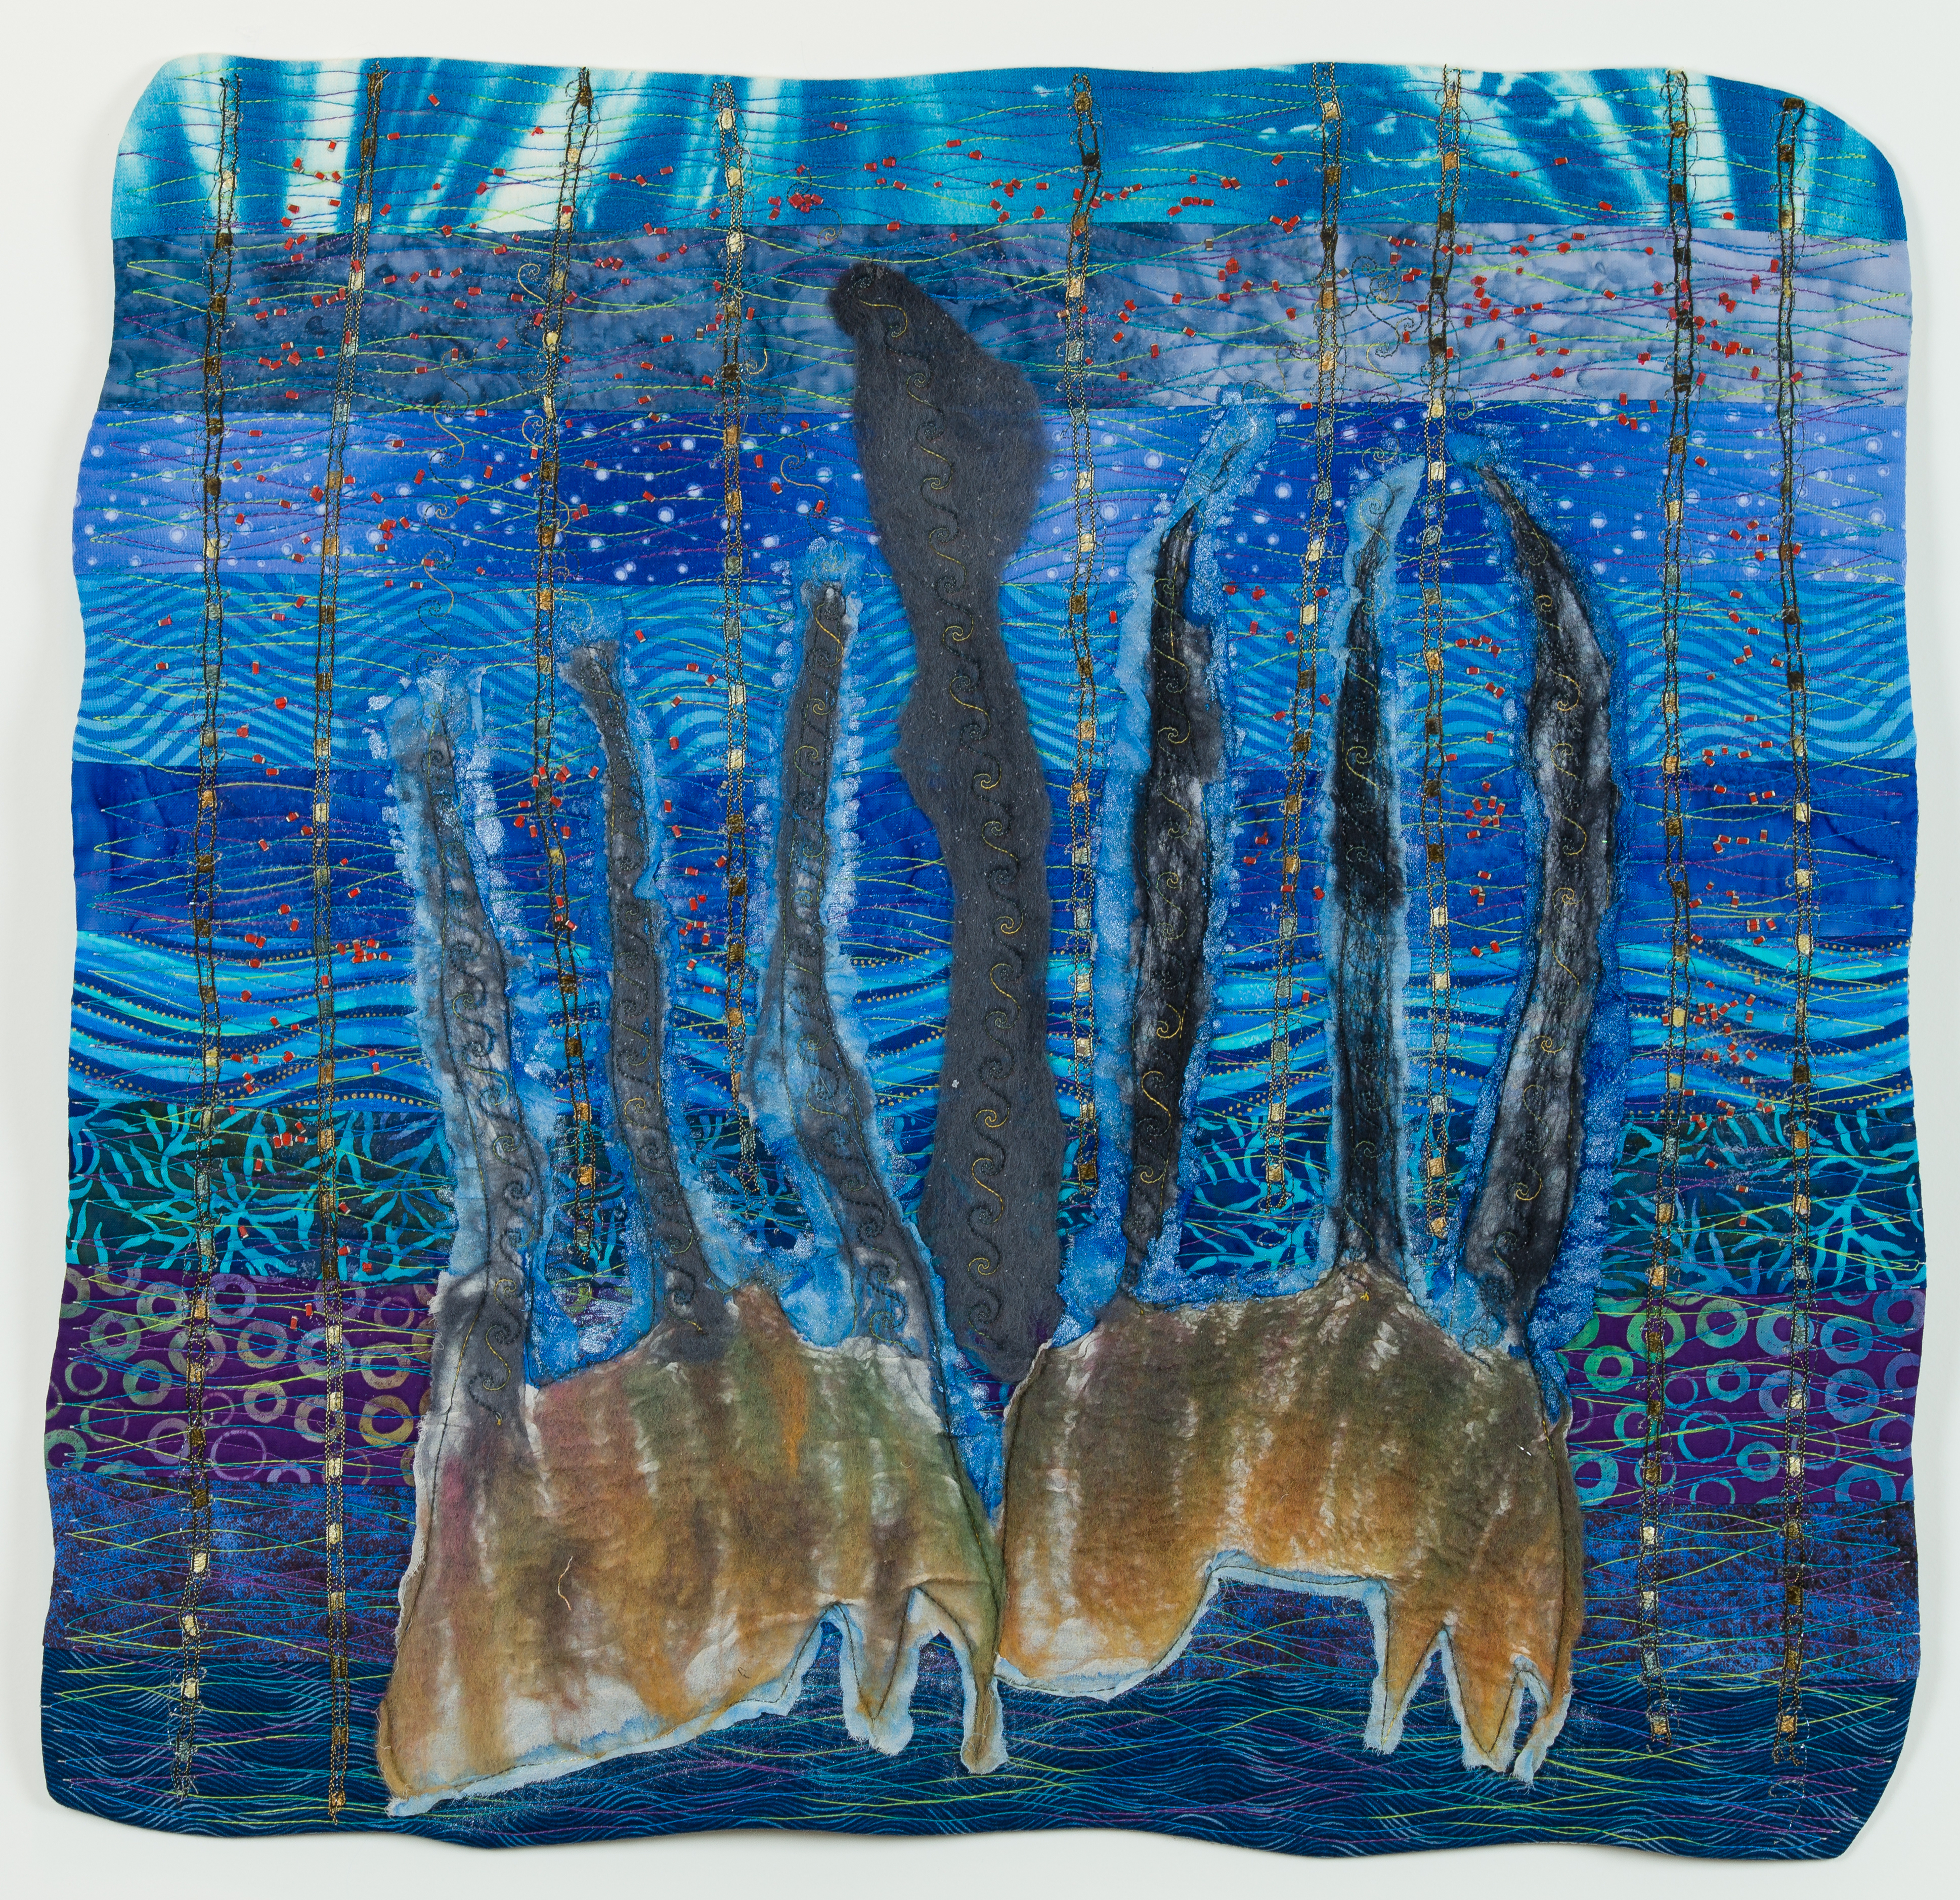
I had the idea that the next panel would depict life growing slowly from the bottom of the ocean, gaining speed as it went, pushing at least one animal out of the ocean, but there was just no way I could make that work 2 years ago, so I had to scale back my ambitions. Instead, I just loaded the ocean as full as I could at the top with a few of the critters escaping the confines of the border.   

js2

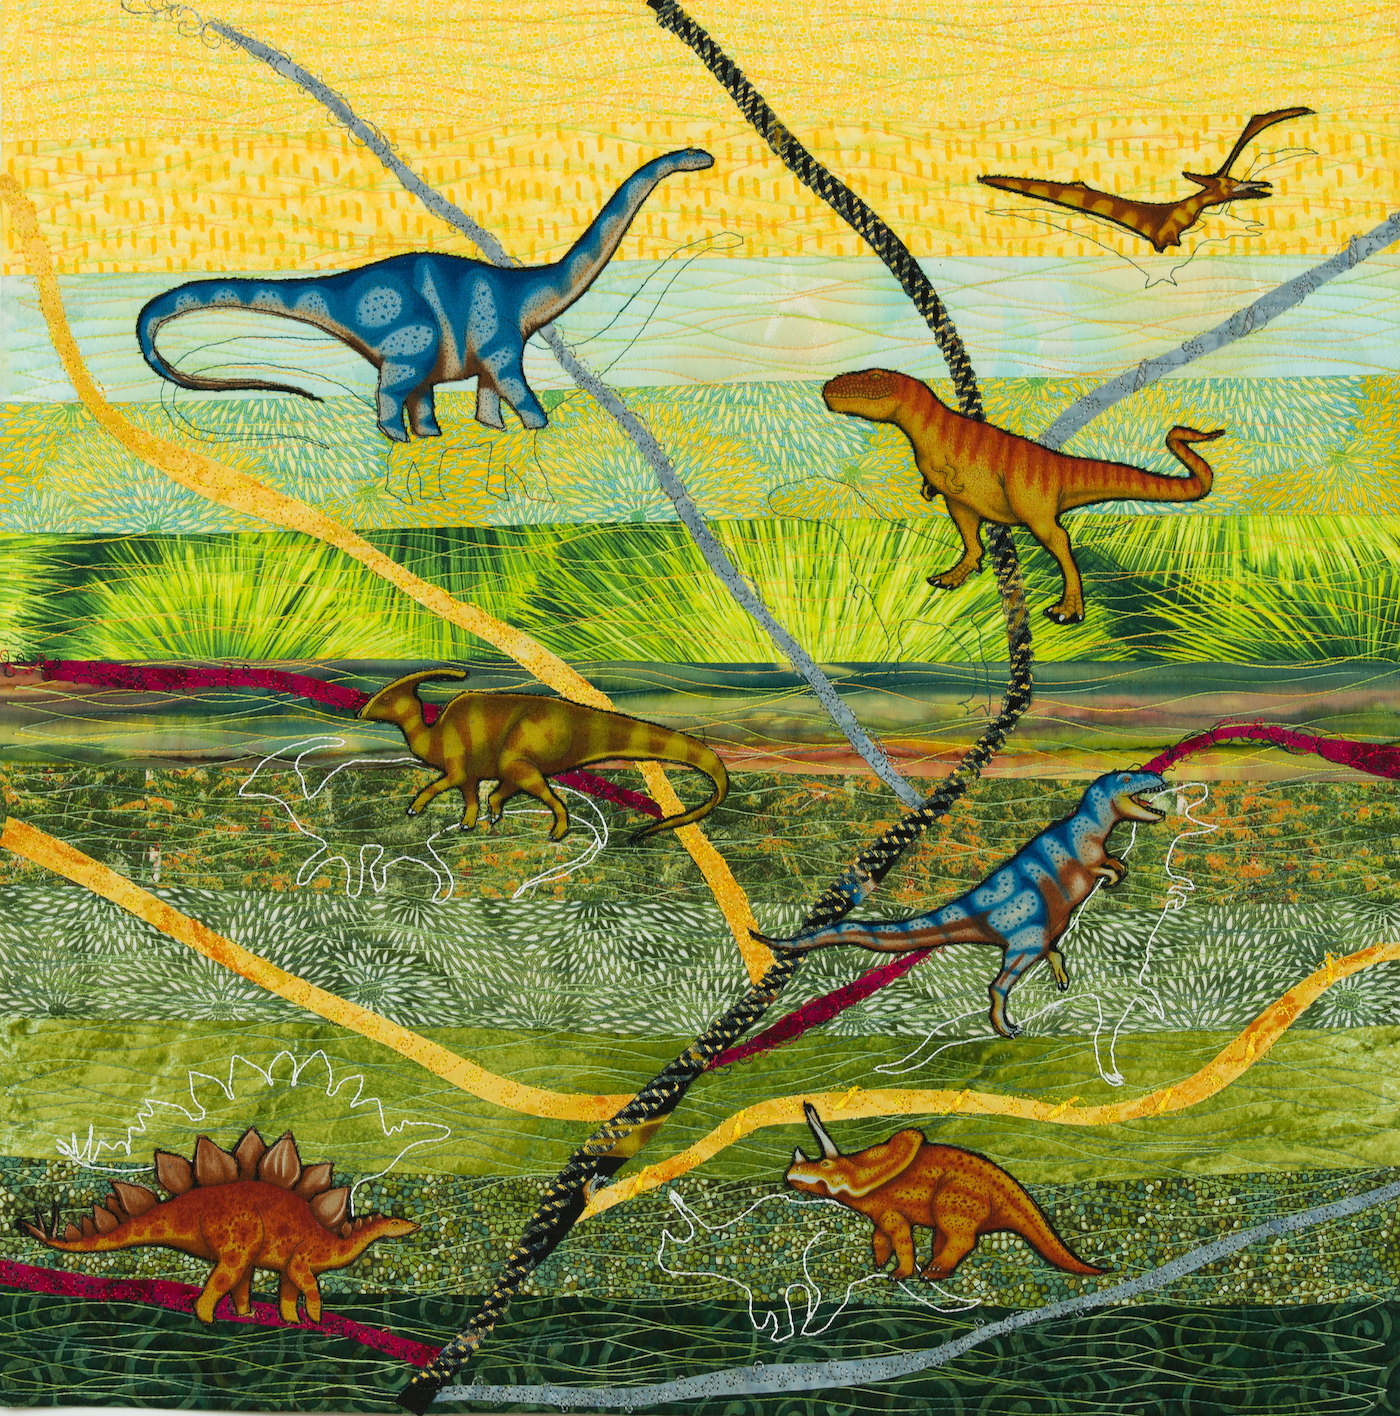
After life forms in the ocean, I moved to land. (Apologies to the botanists — I focused on animal life rather than botanical or even smaller forms of life.)  I had originally thought to put primates and dinosaurs on the same panel and was having a heck of a time trying to figure out how to make that work, so I went to the fabric store looking for help/inspiration/something-to-save-me. I ran into Kim (who works there), and she said “but primates didn’t live at the same as dinosaurs” at which point I kicked myself and said, “oh, right” and beat a hasty retreat. This simplified some issues, but complicated others. I realized I needed to make an 8th panel (which turned out to be #6). Luckily I had screwed something else up and so it was able to sneak in quite tidily (thank you sub-conscious). 

Panel 5 is called Complexity because I wanted to convey this idea that evolution was producing more complex life forms and also because life had become more complicated, with more species vying for niches.  I also had initially wanted there to be just outlines of dinosaurs, since they had gone extinct, but that didn’t work. Placing a dinosaur just on top of the shadow seemed to convey that idea much better. And the branching structure that goes through the quilt represents the idea of species evolving into different branches as well as DNA being part of that since there is stitching over the main trunk that is spiral shaped.

complexitysmall

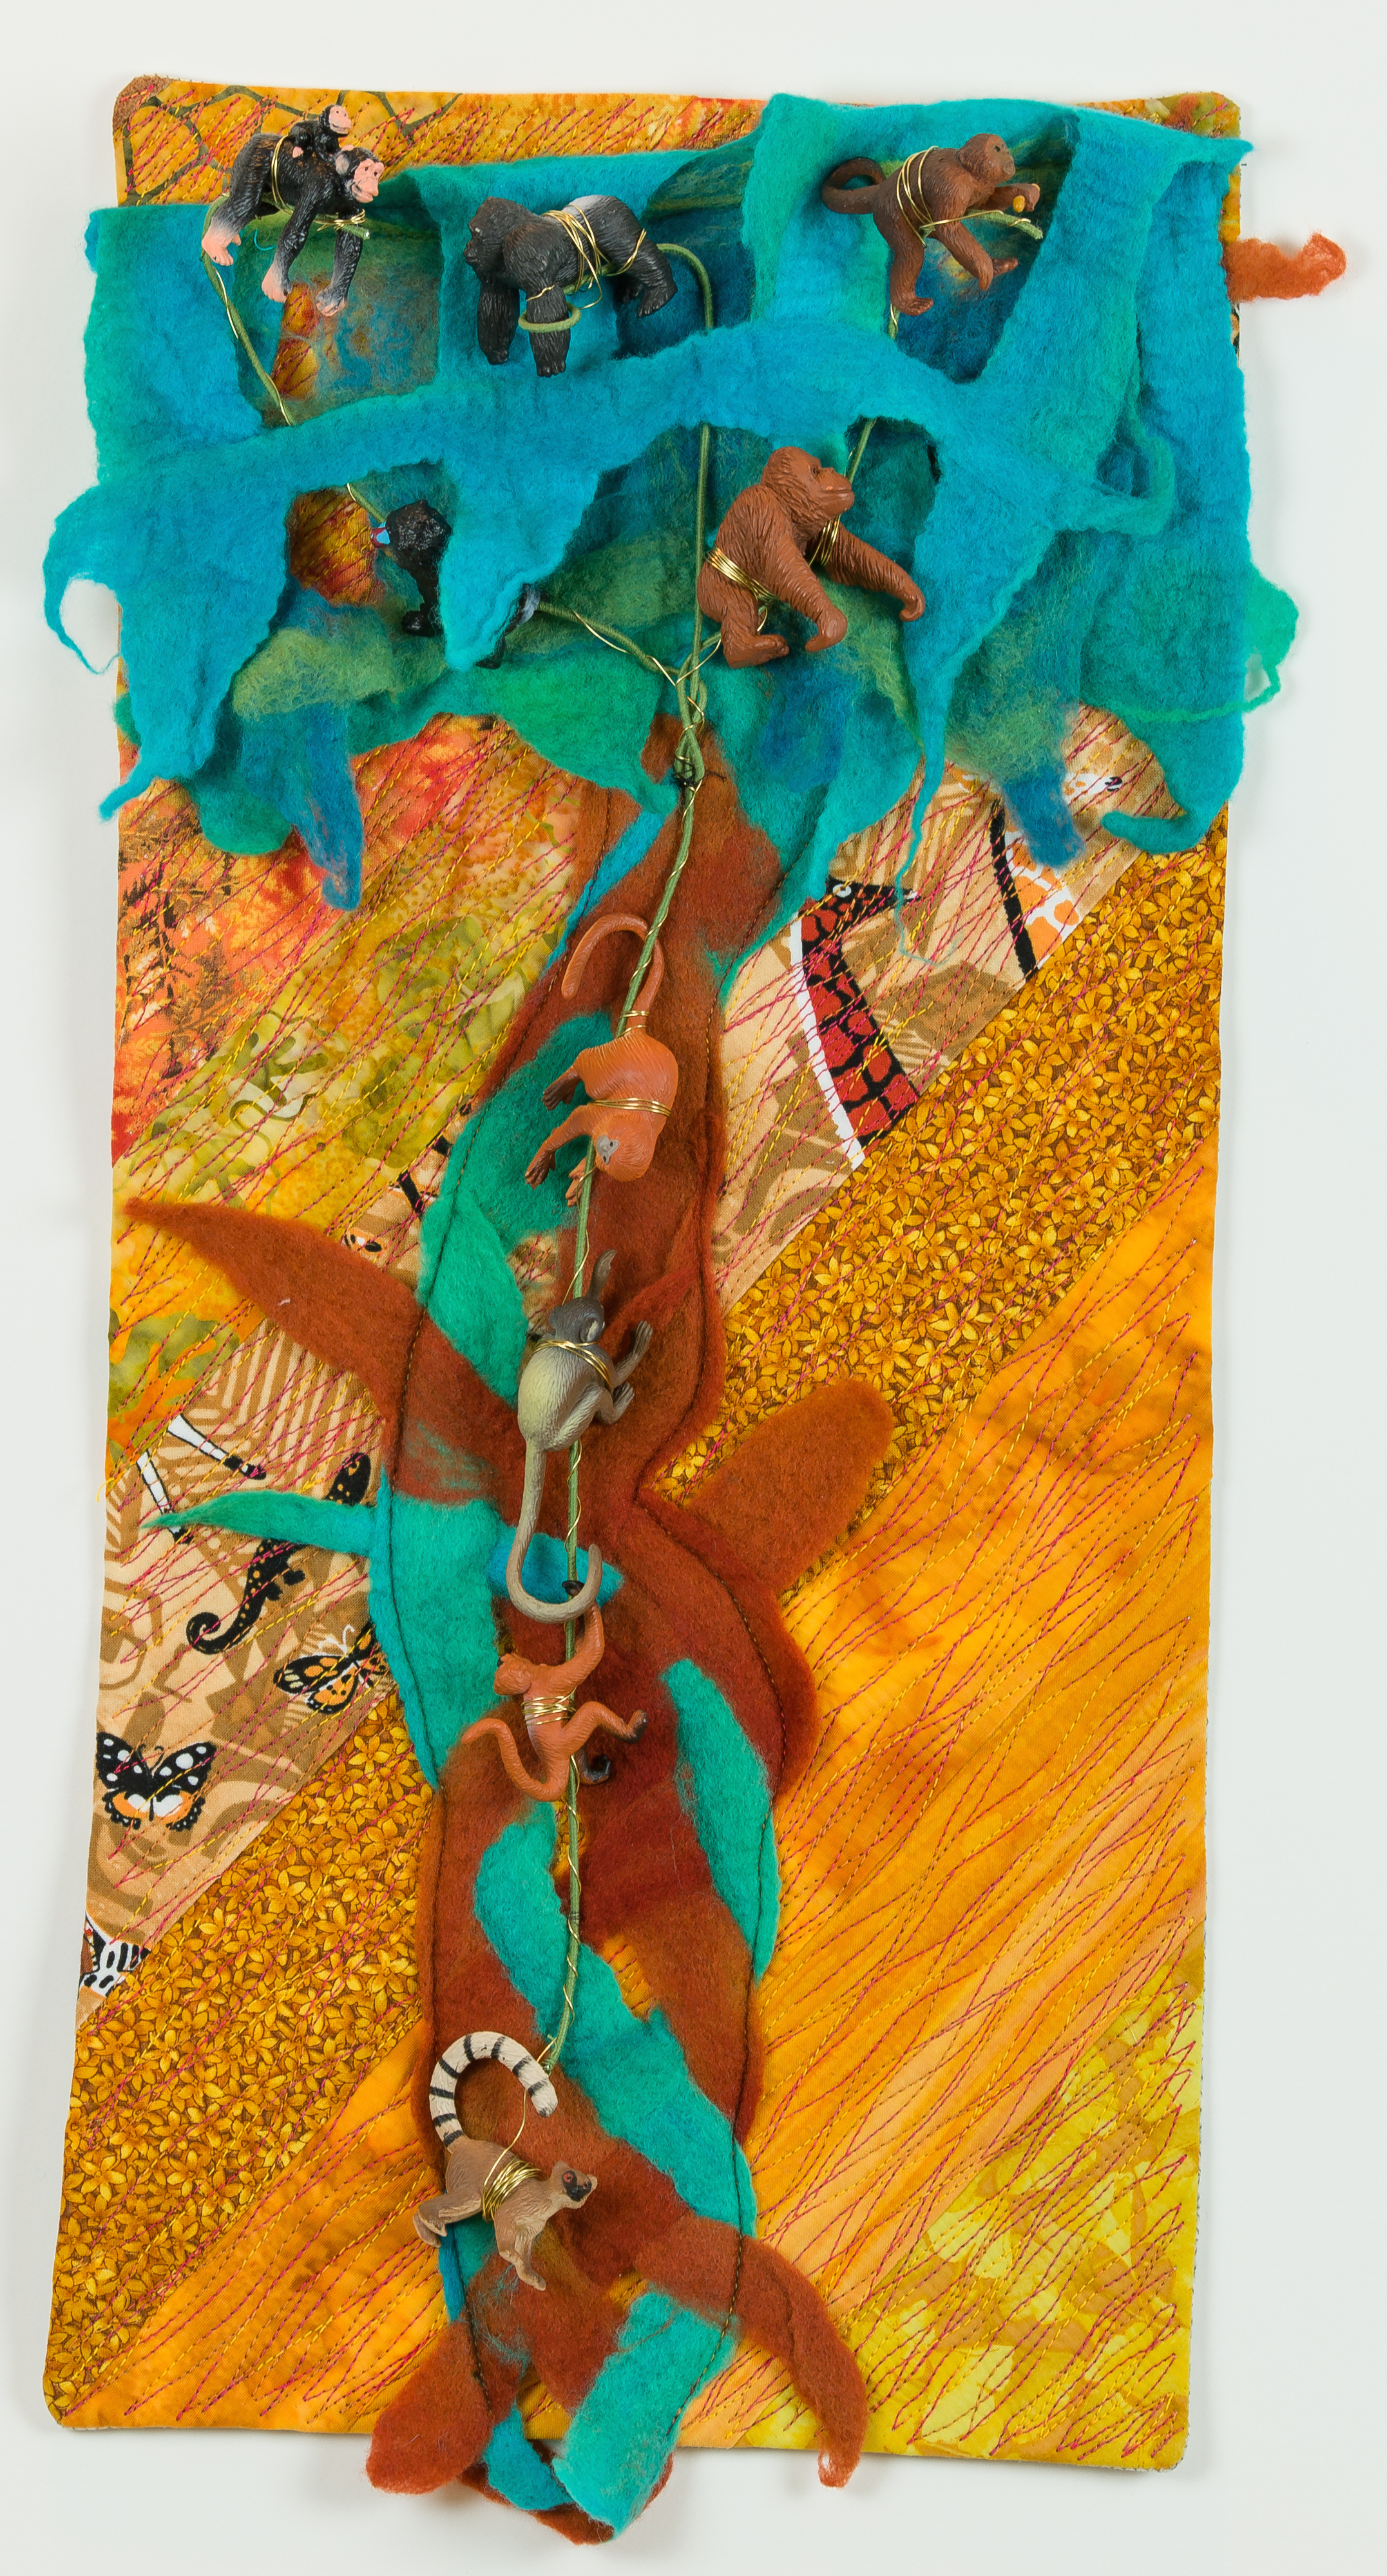
In Grandpas in the Trees, I was able to feature the primates on their own panel. I made the best stab I could at putting them in evolutionary order, with the oldest at the bottom. In order to do this, I consulted with my science friends on Twitter since I know nothing about primate evolution. This panel references a song about Darwin by Dillon Bustin that I learned at dance camp a few years previously (see lyrics at the end of the post). This is also the most 3d panel as I used little plastic figurines for the primates. It was impossible to find suitable primate fabric and I didn’t have the skills to make my own. 

grandpasinthetree

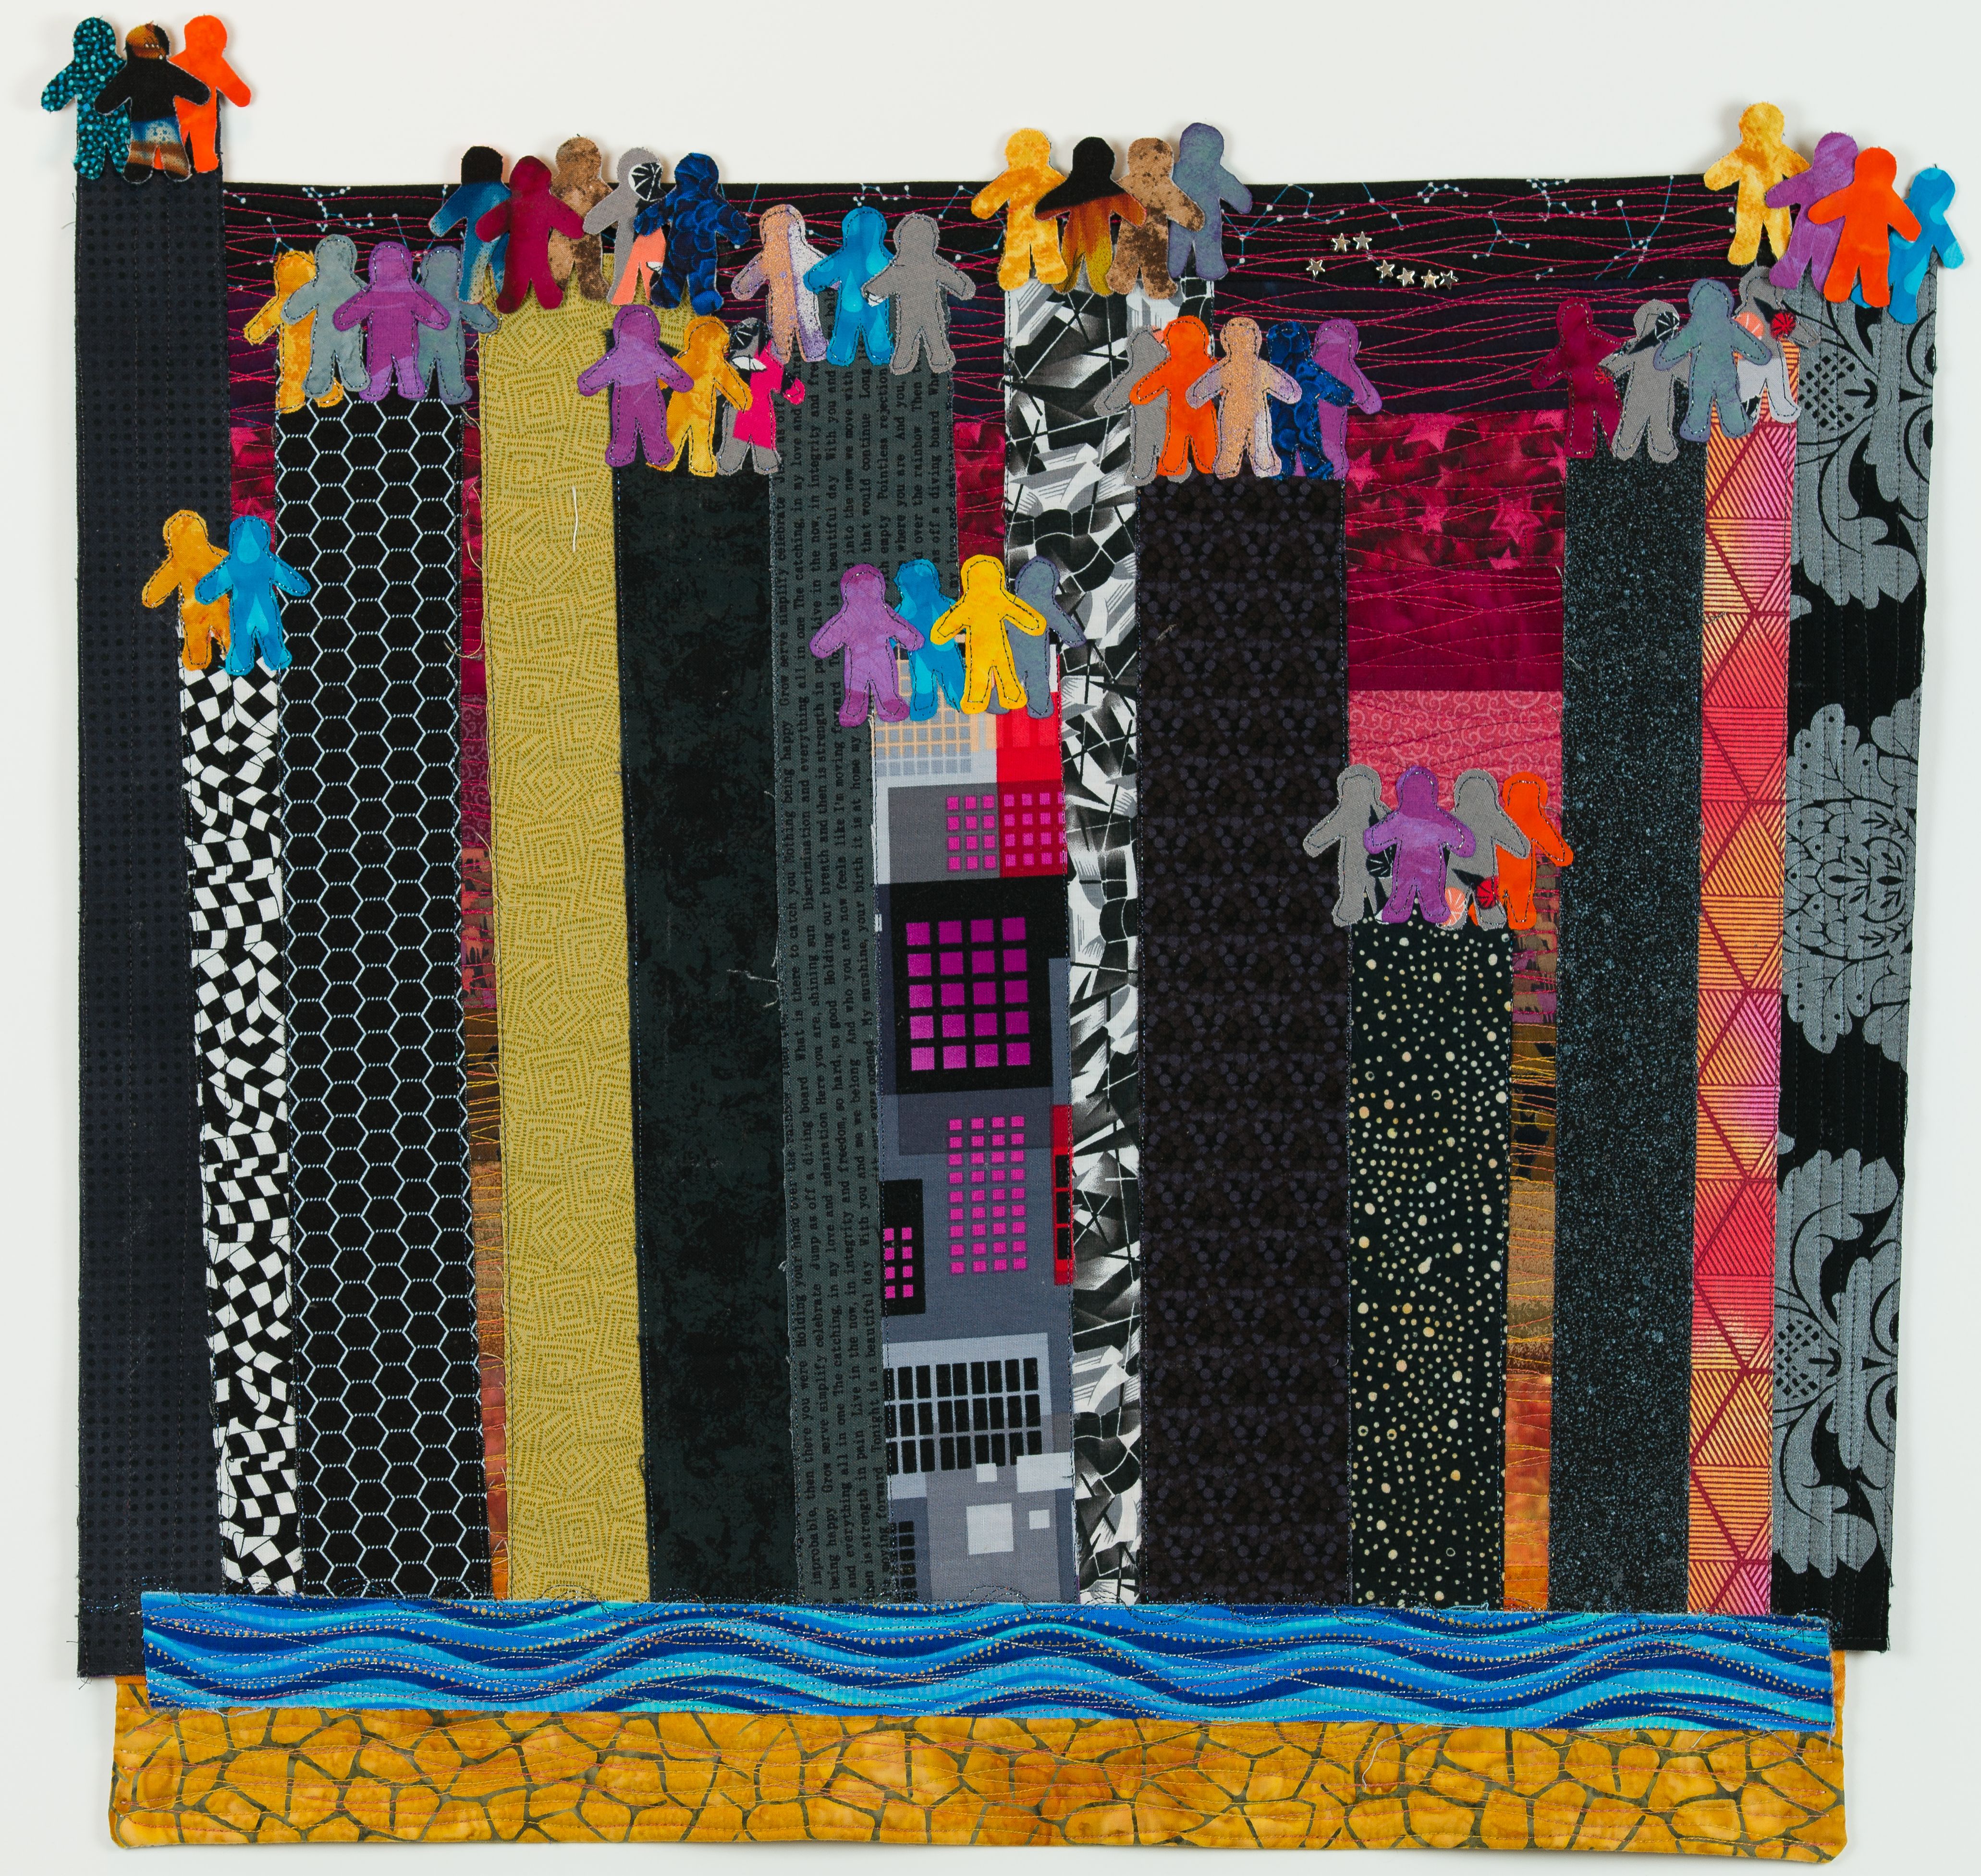
Scorched Earth brings us to the present. We’ve heated up our earth, used up many resources, and overpopulated it. We see some glimmering stars up above, in the sky.  I wanted to portray population overgrowth in a similar way to the fish with there being fewer people at the bottom, but when I previewed that, people said it looked like 9/11, so that representation went out the window.

scorchedearth

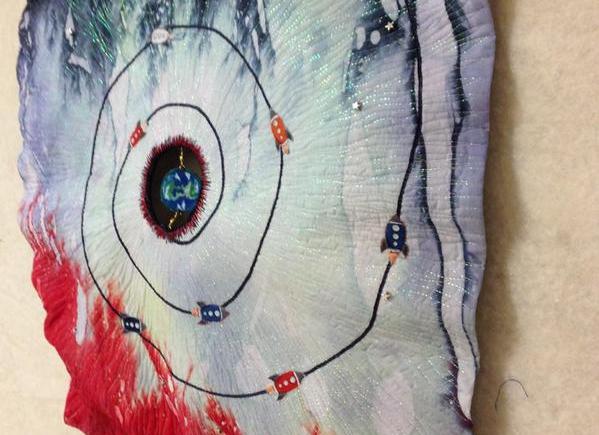
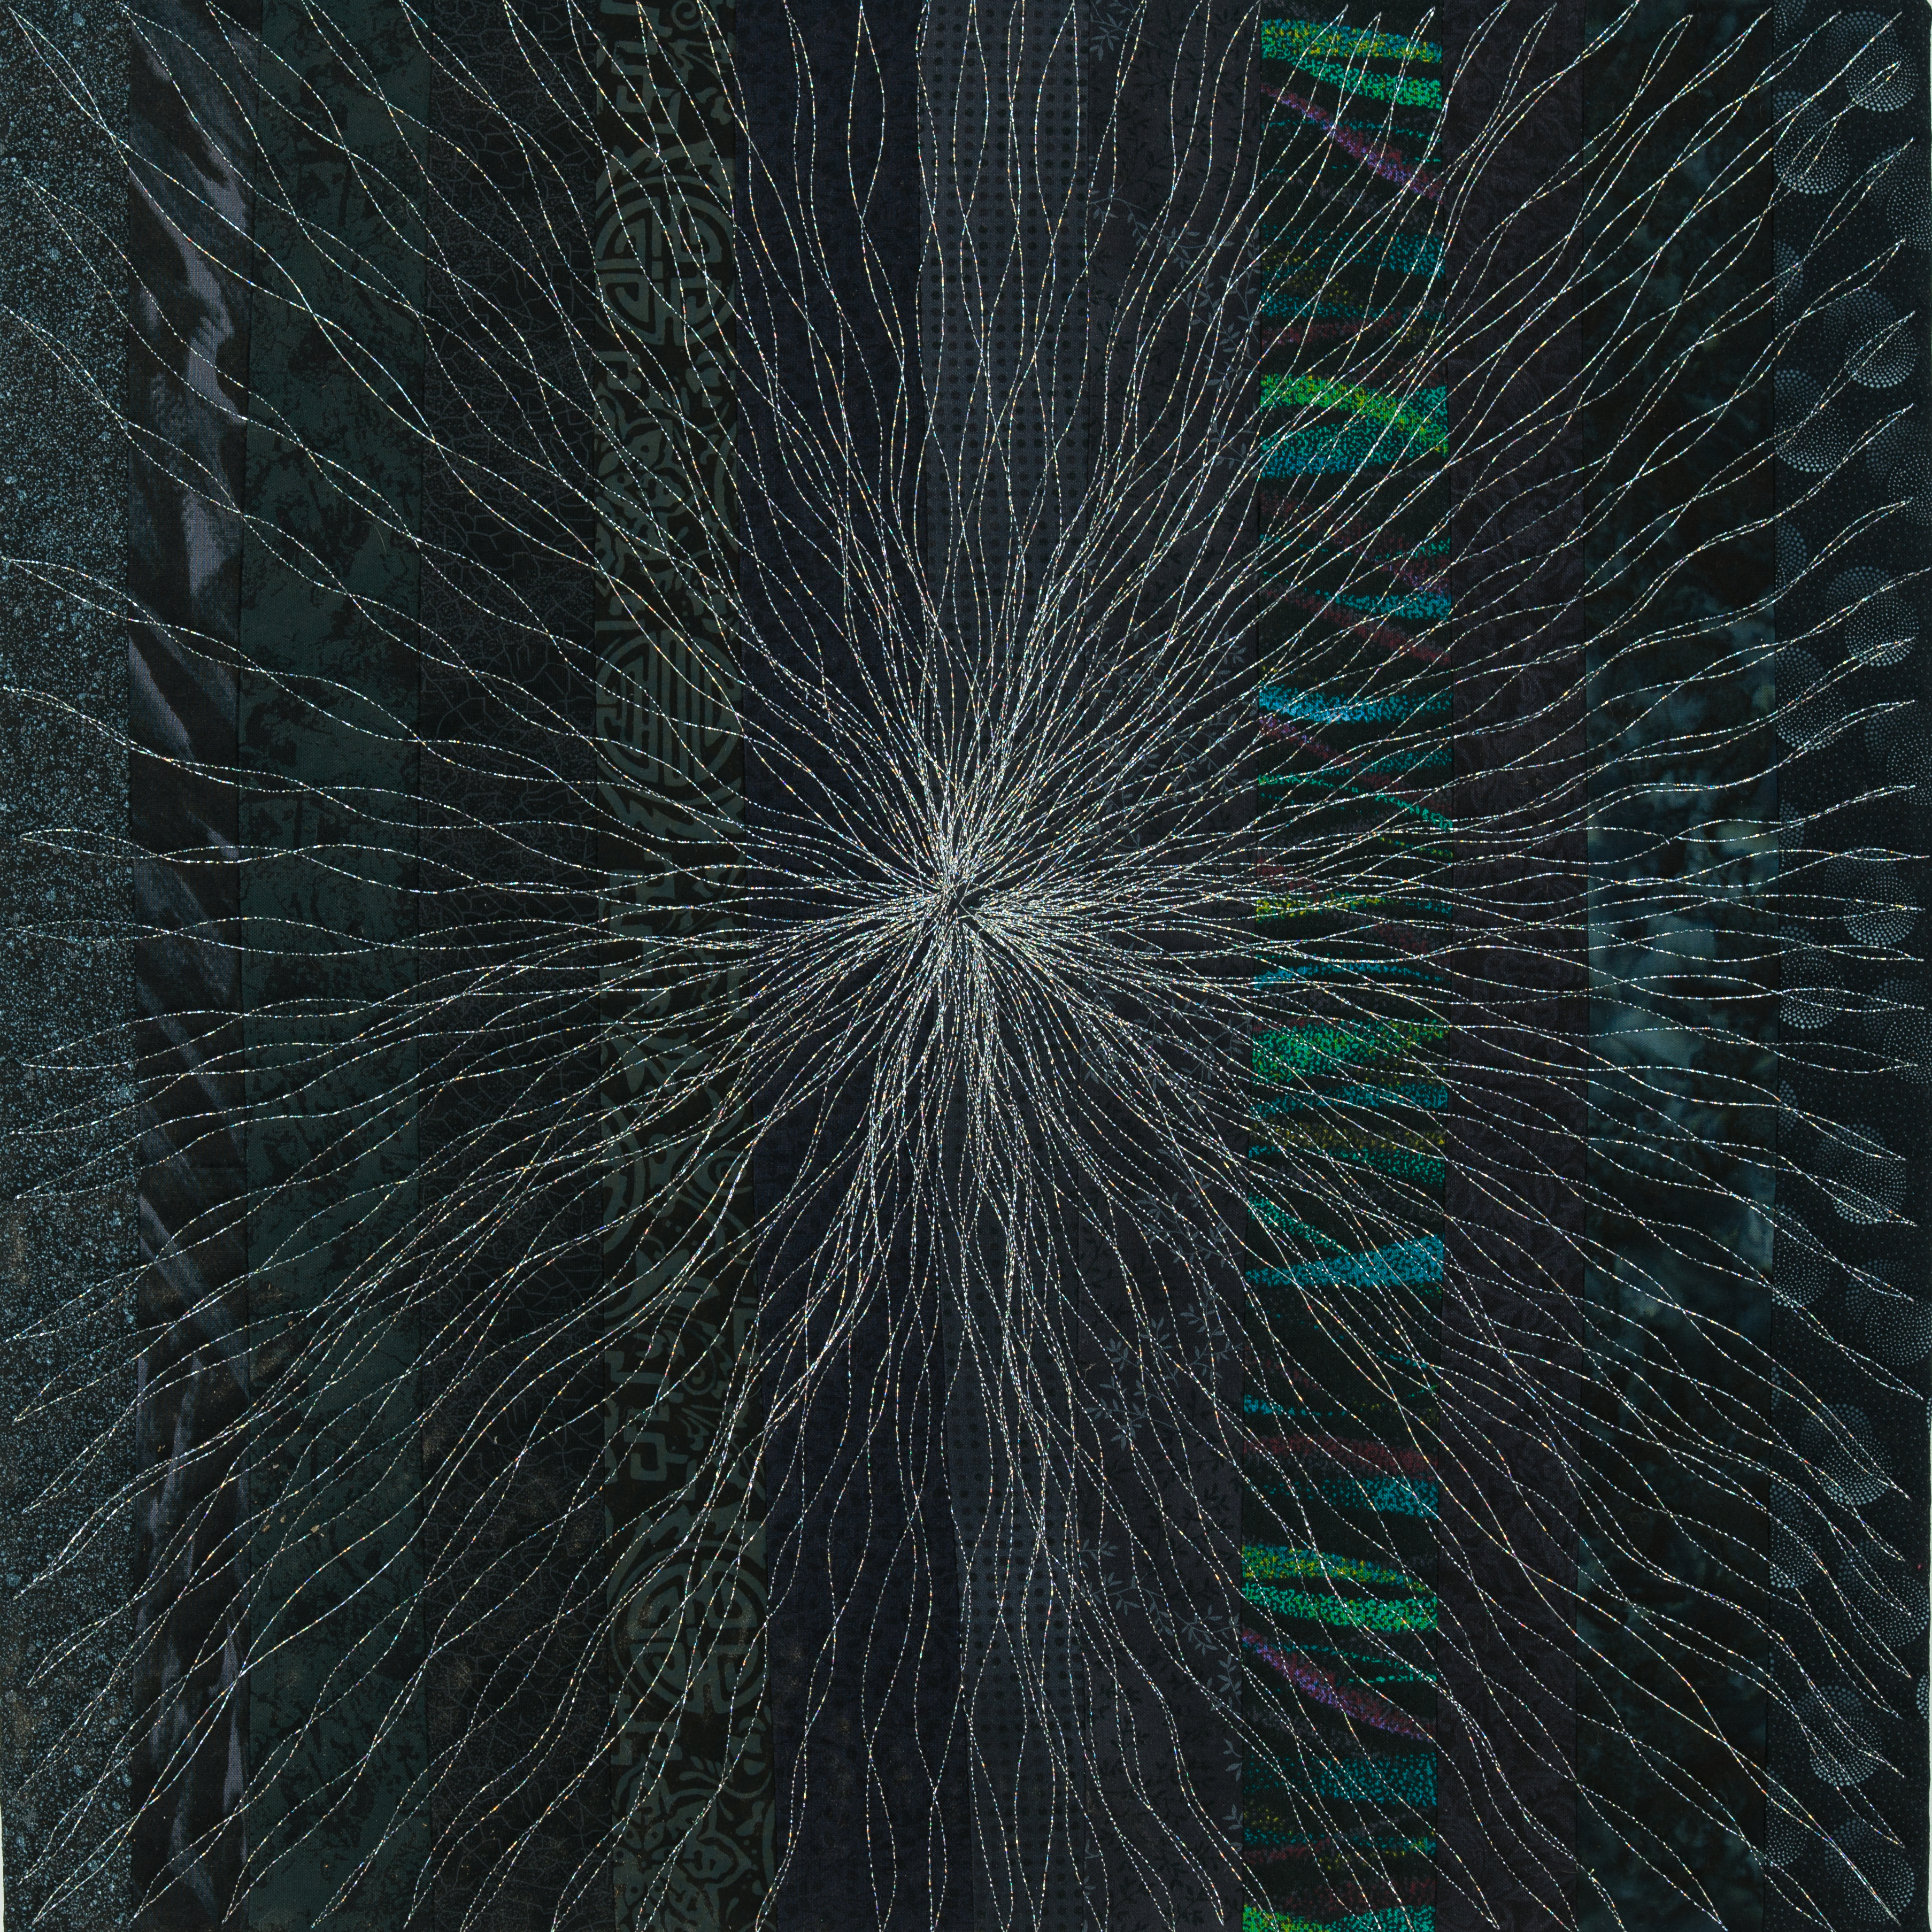
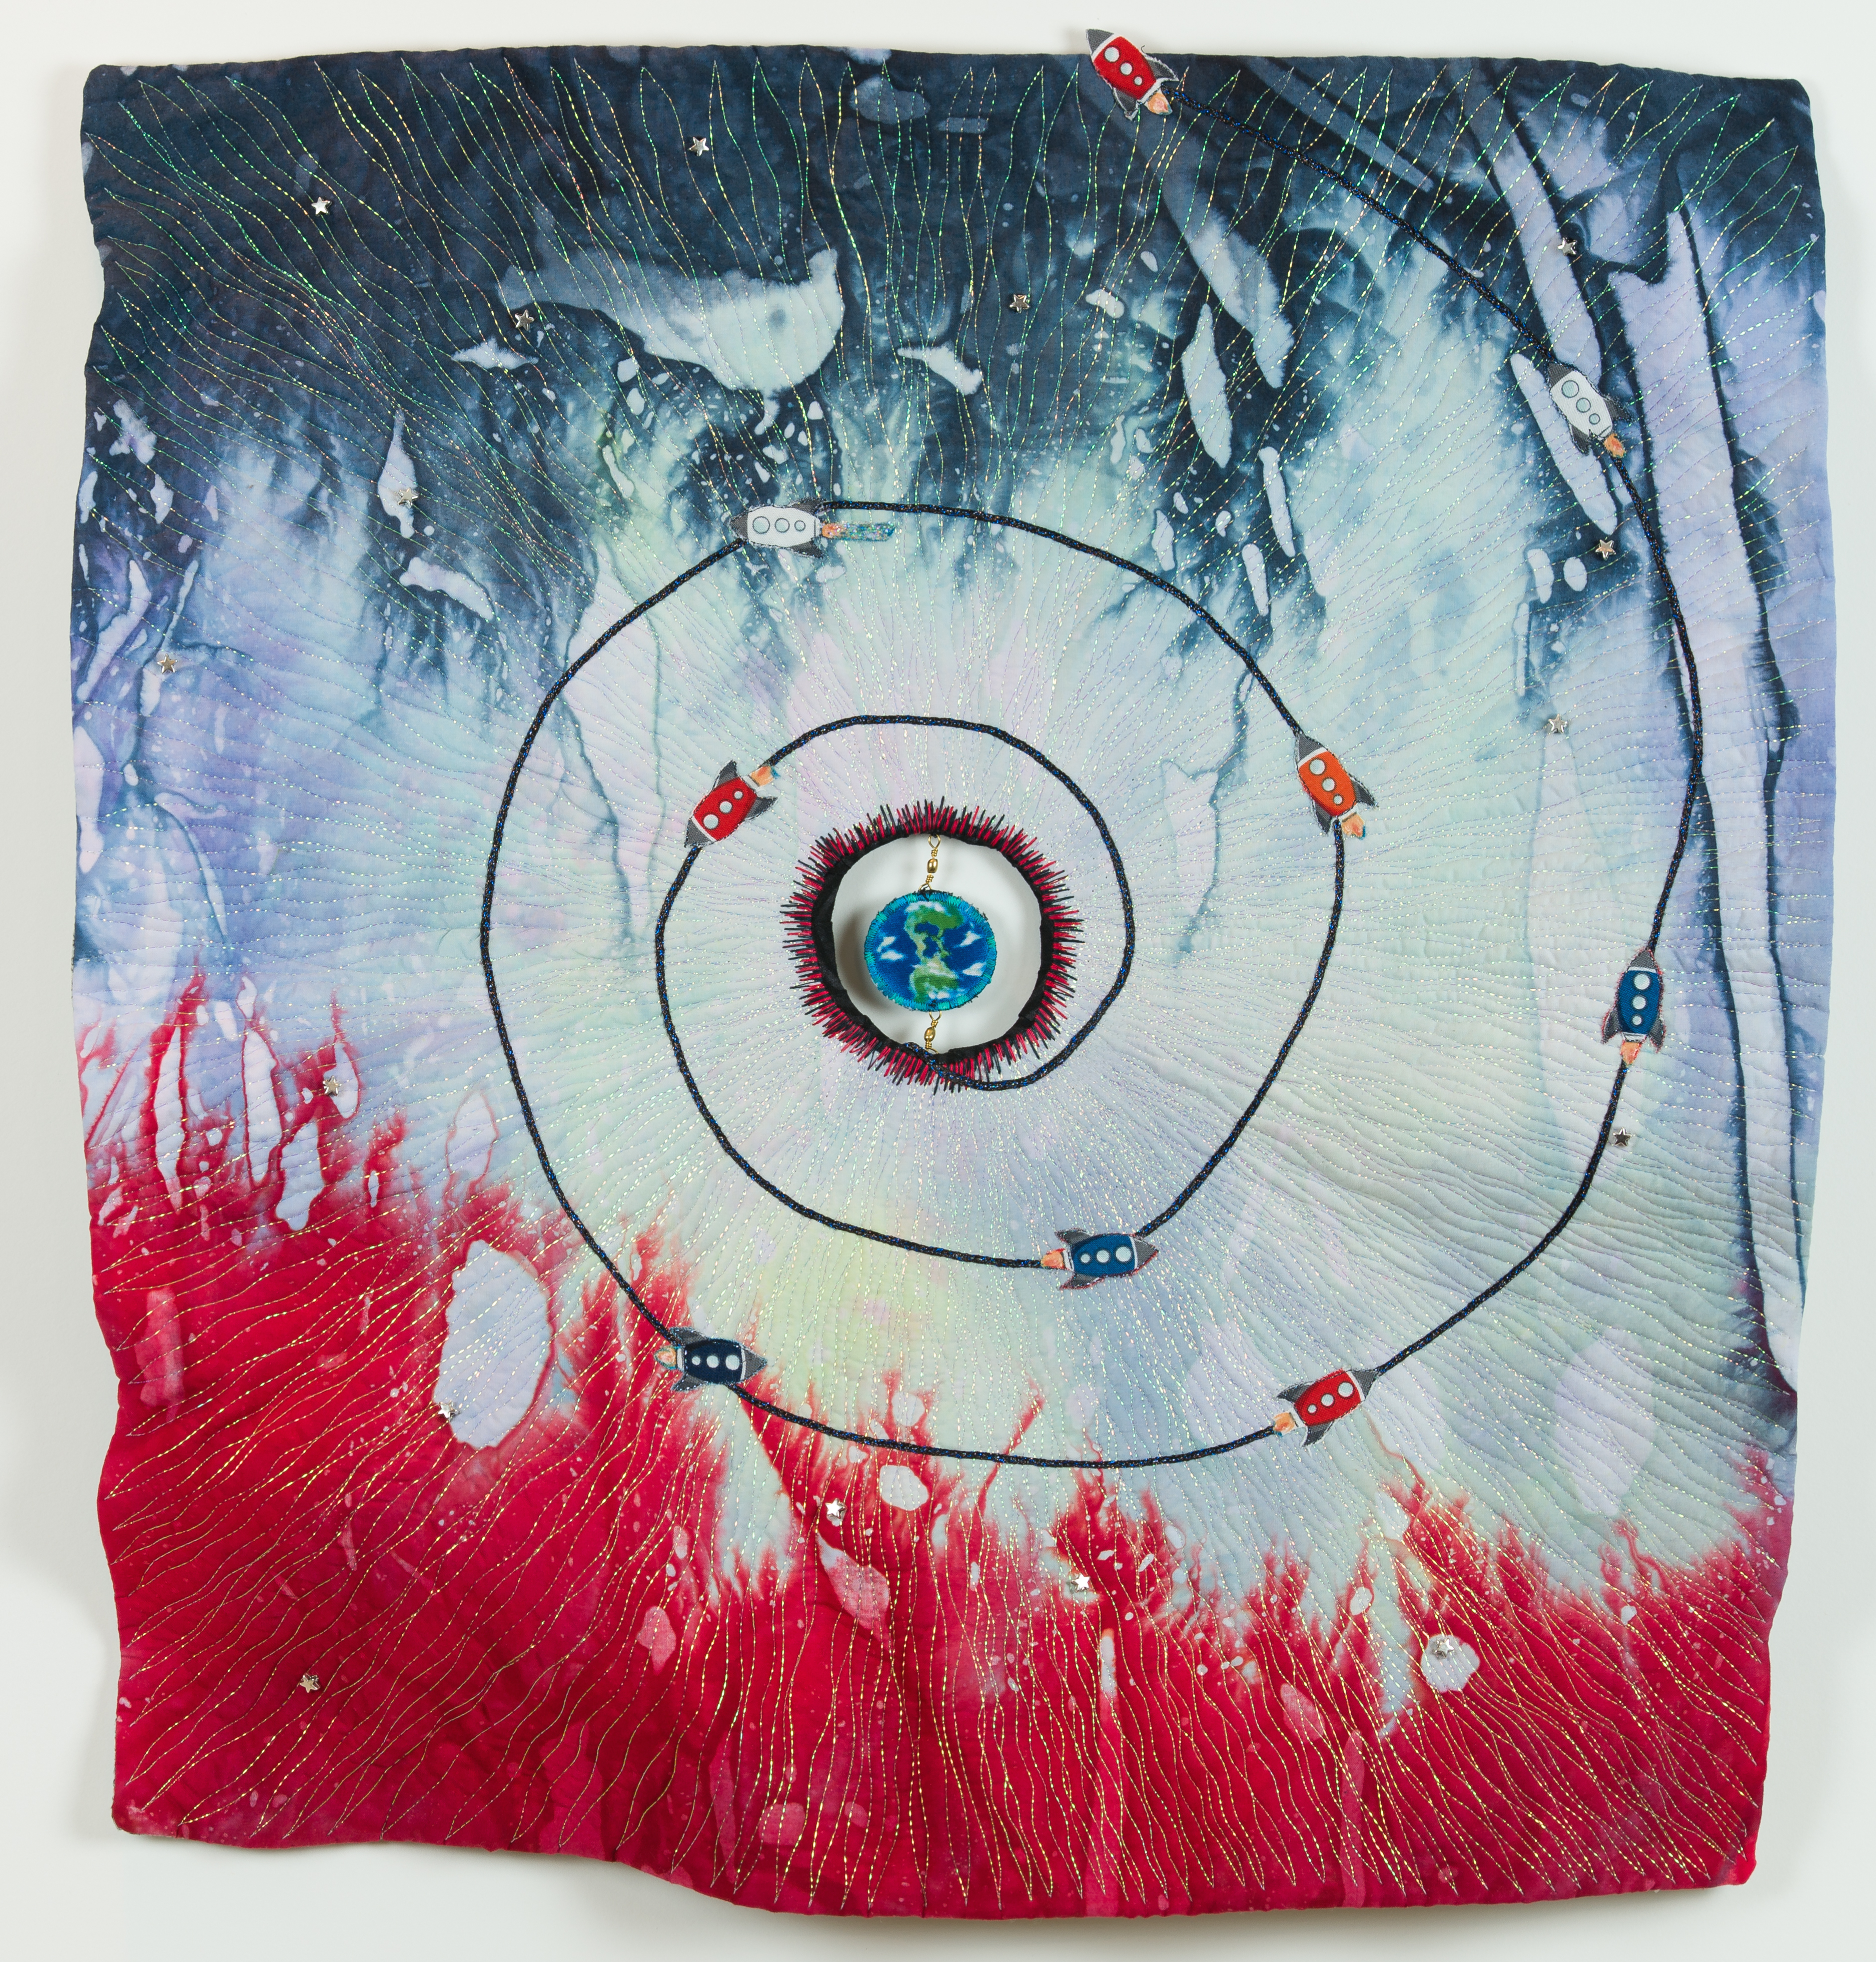
The last panel, Warping the Fabric of Space and Time, was made more than 6 months after I started.  I had actually dyed the fabric shortly after starting the whole project and knew I wanted it to be the last panel. Someone suggested I quilt it in the same big bang starburst pattern, which I thought was a fabulous idea, but I didn’t go back and look at what I had done before. I quilted it much more densely and ended up with a wrinkled quilt. In the end, I love how it’s wrinkled and warped, but in the quilting world, a non-flat quilt is Not Good. Cutting the hole in the middle was supposed to flatten it, but that didn’t work. Instead, it opened up a space to hang the earth. Finally, I happen to know a rocket scientist and I checked with him that the trajectory I was depicting was one that made sense. It’s good to have science buddies.

8warpingthefabricofspaceandtime

I think this needs another transition – maybe echo back to the first paragraph about the overlap between your different social circles and how they interact.

In the end, this project combined my interest in science, my passion for textile arts, and the social connections I have, much to my satisfaction. My whole life, I’ve always felt like an outsider — until I was encouraged to make art and then found other people who were also making science-themed art.  

Dillon Bustin’s song about Darwin:

I am sailing on the Arafura Sea, 

Where Charlie Darwin went before

Saw that every creature had a form of self protection,

Trying to adapt in the natural selection,

It seems that every species has an itch

To try to find itself a better niche.

(Chorus)

Oh, nobody stays where they should anymore,

Nobody is happy where they are.

Fish try to fly, birds try to swim,

Snakes leave the dry land and slip beyond the brim

And the crabs crawl ashore and look around,

Wanna dig a hole in the ground.

I am sailing on the Arafura Sea, 

Where Charlie Darwin went before

I notice that the air is full of flying fihs,

To escape the tuna is their fondest wish,

But when did the first fish decide,

To spread his little fins and try to glide?

I am sailing on the Arafura Sea, 

Where Charlie Darwin went before

The blue footed booby’s in a power dive,

Hit the sea so hard it’s a wonder they’re alive,

But I guess that the boobies know the best,

They’ve got a hidden airbag in their chest.

I am sailing on the Arafura Sea, 

Where Charlie Darwin went before

Looking down I’m suspecting a mistake

Every wave is full of swimming snakes

And I must say it scares me half to death

To think a snake could learn to hold its breath.

I am sailing on the Arafura Sea, 

Where Charlie Darwin went before

I do believe if he says it it is so,

I am descended from an ape long ago

But here I am a’sailing o’er the seas,

Pondering my grandpa in the trees.

WHO AM I? I AM SCIART.

Bef (e porter) @snowbringer tweeted:

The state of today:
*sees the art of all the other awesome peeps*
*looks at own work*
*creeps back into a dark corner to hide*

I replied:

I do this too.  Then remind myself that comparison is killer.  We are each on our own journey.

https://twitter.com/artcollisions/status/867432073547657216

I Am SciArt

This guest post was written by Joni Seidenstein. Joni (@artcollisions) was our curator from November 27th to December 3rd in 2016. To learn more about Joni’s textile art or to purchase your own, visit artcollisions.wordpress.com. All photographs in this post are by Ron Freudenheim.

My daughter says I have six social lives — quilting friends, art friends, twitter friends, dancing friends, and singing friends (and then of course whatever my kids are up to). I tell you this by way of introduction. In my creative work especially, I have a finger in every pot and I’m happiest when some of them interact.

In 2015, I worked for most of the year on 8 panels that tell a story of evolution. I was inspired by a specific call for entry on the theme of Diaspora (the spreading of a population outwards). As soon as I saw it…

View original post 1,412 more words

How to price your handmade textile artwork

toadova


Today I was asked how do I price my artwork. After a few exchanges, I was encouraged to write up a blog post about it. So, here is my two cents. I don’t think it’s original.

So, let’s get down to the nitty gritty. Put a price tag on your artwork already!

  1. What are comparable items selling for?
  2. What’s your market audience willing to spend?
  3. How much time did it take you to make the thing?
  4. How much did the materials to make it cost?
  5. Don’t forget to factor in time you spent designing the thing (if it’s original, which it most likely is, if you are reading this).
  6. And don’t forget that you have overhead costs (commissions, listing fees, rent/mortgage, food, travel, classes, etc).
  7. Don’t underestimate the amount of skill you have, especially if you have been doing the thing (whatever it is — writing, baking, embroidery, sewing, quilting, etc) for years
  8. Feel free to pay yourself minimum wage. (Personally, I don’t keep track of how much time I spend on a piece because my time is so broken up and it would drive me crazy to keep track of it.)
  9. The gap between what you want to make and what people want to actually pay for to own can be huge.
  10. Charging less for your work than what it’s worth doesn’t benefit you or other craftspeople. It actually harms them, even if you don’t *need* the money.
  11. It is AOK to make things as gifts for people. You do not have to try to sell every piece you make.
  12. I suck at marketing. I got no tips for you there, but if your work is not selling well, it may not be the quality of your work or the price you are putting on it.

Here are some blog posts that might be of interest (and which are much better written than mine).

Sewmamasew writes about placing a value on our quilts.

Mooreapproved writes about the real cost of quilts.

Hunterdesign studio has at least two great posts about pricing work. First is here.


I’m now going to end with a couple random quotes:    “Fungal mats are awesome.” and “It never hurts to have fresh hair.”

PS: check the comments for helpful links to further reading!

Kintsugi

2016 was a pretty terrible year for me. I experienced heightened anxiety that randomly started in April and it was August before I realized it wasn’t “just going to go away.” I spent another two months adjusting to meds before I realized how impaired I’d been. I cannot tell you what a relief it is not to have to worry that my body is going to dissolve when I go out though.  The meds do not “take the edge off”: they provide a sort of prosthetic skin.

So, when I got a commission in November, I was a bit cautious, wanting to understand what the person wanted, especially as it was for a usable quilt and I’ve not made anything other than strip quilts for a couple years.

The person wanted a strip quilt, as I’d done before and color preferences were for green, blue, and purples. So, off I went.  When I make strip quilts, I try not to think too much ahead. I just work with the colors I have in hand and make sure they work next to the colors around them.

This is good therapy for me. It’s useful for me to not overthink when I’m creating and let’s my subconscious do the driving.  I noticed as I got about half way, that it was no longer straight on both sides, so I added a sliver of orange/red, inspired somewhat by Leonard Cohen’s death and his lyric about the cracks being where the light shines in. That is why I call this quilt Kintsugi.  It’s about being made of pieces and mending the broken or wonky parts when we need to. It’s about letting all the parts of ourselves exist in harmony together, even if they seem disparate. We contain multitudes and we are star stuff.kintsugi

Decay, Disintegration, Distortion

Charity Janisse recently posted a picture of rusted metal on Twitter, which got me thinking about decay. I realized that I tend to focus on themes of vitality in my work and working on the flip side could be interesting.

flame-1024x1024

Flame taken by Charity Janisse and posted in this online article.


Then Lorie McCown came and gave a talk about her work to my quilt guild. She uses a lot of textiles in her work with frayed edges. Boy did she get me thinking about disintegration (as well as making your mark). You can find some great detail shots of her work on her Instagram account here.

And I’ve been talking to people who do computerized generative art. I think it was Anders Hoff who got me thinking about distortion when he posted these.


So, when I found myself with a week with one kid who was going to be gone from 9-4:30 every day, I jumped on the chance to work on a series of 5 panels which I dubbed “Obsessive Stitching 1-5”.  My initial idea was to work with all over patterns, as I had done in the Trajectory: Escape Velocity initial and final panels, but after two days of that, I got bored.

Here is day 1 and day 2.


I had hoped that the above finished panel would be more buckled (as it was promising to do below and like the panel from day 1), but it smoothed itself out in one dimension, while warping the shape!

Day 3. Here’s what happens when I do the same thing over and over. I have to change it up. This one needs more quilting, but I wasn’t able to finish it in one day.


Day 4 I decided to go back to the all over pattern and not worry about distorting the fabric. I was focused more on accentuating the pattern that the dye had created and adding texture. I used two metallic threads (black and red) in one needle (one eye, not two). Here is the result. It’s very subtle. I am quite pleased with how this turned out and think I might add some beads before I call it completely done.

By Day 5, I was exhausted, had run out of food, and had other things to attend to, so I only had a couple hours in the studio. I decided if I worked small(er), I might be able to get something substantial done. Initially I was going to make coccolithophores in space, but that seemed too daunting by Friday afternoon, so I switched to jellies instead. This picture is a bit of a cheat because I only made three jellies the first day. Also, the tweet is misleading. There are 12 jellies on that panel.

All in all, I have to say it was an interesting week. I rarely get concentrated time like that to work, and certainly never 5 days in a row. Working only with hand dyed panels felt very different to me. It is certainly a way to more easily incorporate organic patterns into my work. I also don’t usually focus on the stitching. That has typically been a way to just hold the thing together and add color. Using stitching as way to get to texture was very satisfying, especially as I think of my work more and more as 3d.

I look forward to playing more with stitching and themes of decay, disintegration, and distortion.


Making mistakes work for you

Many of us have this notion that mistakes are things we learn from so we can do something better, but what if you make a mistake and you can’t fix it? As an artist, this is an opportunity to make your work more exciting.

Usually we have this idea that when we make a mistake, we learn from it so we don’t do that thing again. For instance, how many times did you sew two pieces of fabric together in the wrong orientation? Didn’t take too long to figure that out, right? Or how many times did you cut improperly? These sorts of mistakes are good because they make us more careful in our work.

But, then there are the “mistakes of planning,” I’ll call them. They aren’t caused by the same inattention the above errors are. When these mistakes happen, your stomach drops because you feel there is no return from this sort of mistake. Don’t get me wrong, I still get that feeling, but it doesn’t last as long because some of these sorts of mistakes have lead to the end product being much more interesting.

This quilt, with the spiral in the middle, I’d initially intended to have bugs and music on it. When I went to the store, the best I could do was this lobster print. It was black and the lobsters were big, but they were important and I couldn’t release them. Instead, I worked them into the design and put them into the flying geese, which was when I discovered another mistake: one of the lobster parts was flying backwards. Baby quilts are a great place to experiment with design because the baby won’t care.

lobsterdone

Another mistake turned into a feature was when I made my older daughter’s bed quilt. I got to the borders and discovered I didn’t have enough of the fabric to go all the way around. Ok, fine, I thought, I’ll just do one edge pink and the other salmon. Which worked if I didn’t have any fabric in the corners. Back to the drawing board. That’s when I realized there was a secondary pattern in the main pieced part of the quilt that was a sawtooth star. Great, problem solved! I would just put sawtooth stars in the corners! It’s now my favorite part of the quilt.

aequiltfrontaequiltclosestar

Fast forward a few years and my work is diverging from traditional quilting. The mistakes I’m making now are real opportunities to stretch as an artist.

My normal mode of operation is very “think out loud.” I try not to fasten anything down permanently unless I’m sure, but sometimes things happen that I didn’t prepare for and then I have to adjust.

The last panel for Trajectory: Escape Velocity, in my head, was going to be quilted in the same manner as the first panel. So, off I went and quilted the panel — without looking at the first panel. This time, I quilted it much more densely than I had done with the first panel. Oops, it buckled like mad. I figured, I’ll cut a hole in the middle and then it will be flat and then I can figure out how to cover up the hole. I remembered someone talking about doing something like this. And the panel was unique; it was made from a piece of hand dyed fabric. I couldn’t just scrap it and start over.


Well, I cut the hole and it was still wavy. And that was after I enlarged it at least twice. I put it down and went to bed. The next day, I came back. I couldn’t bring myself to cut into it more. Then I found myself thinking, it’s fabric. Why does it need to be flat? What if I make this work for me? I decided to go with it and it has become a dimensional panel with a hole in the middle. These are special features of this panel. It suits the message I’m trying to get across and it actually is much more interesting than if the panel had been flat with no holes.


So, sometimes mistakes are an opportunity to practice flexible thinking.